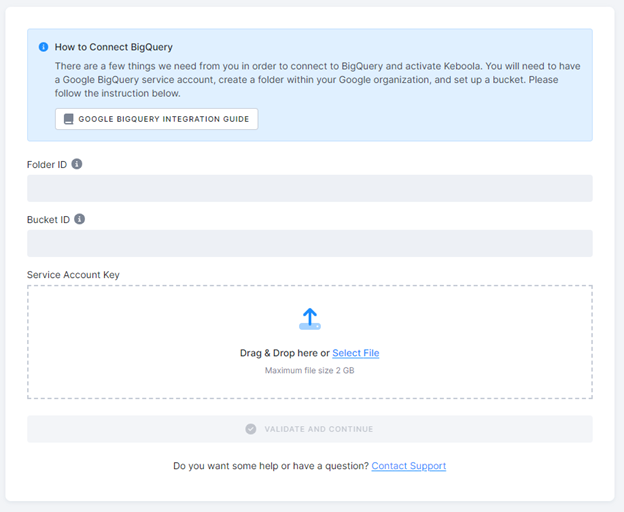
How to Connect BigQuery
- Create a Folder
- Create a Project
- Enable API Services
- Create a Service Account
- Create a Google Storage Bucket
This guide is designed to walk you through the essential processes of setting up and configuring various Google Cloud resources for connecting your BigQuery and related services to your Keboola project. From creating a dedicated folder in your Google organization to creating a project and a service account, each section is tailored to ensure a smooth and efficient setup.
Create a Folder
- Go to IAM & Admin > Manage Resources and click on the Create folder button.
- In the Folder name box, enter the new folder’s name: “Keboola”.
- Under Organization and Location, select the organization resource or folder under which you want to create your new folder. If you have any difficulties creating a folder, learn more here. Click Create.
- On the Resource Manager page, uncollapse the organization, locate your created folder, and copy its ID to the Keboola BigQuery registration form.
Create a Project
- In the Resource Manager, click Create Project.
- Set the Project name to “Keboola Main”.
- In Location, choose the previously created folder. Click Create.
- Once the project is created, select it by clicking Select project in the notification or find the project using the selector in the top left corner of the Google console.
- Ensure that billing is enabled for your Google Cloud project (verify that billing is enabled).
Enable API Services
- Open APIs & services in the navigation menu of your project. Click Enable APIs and Services.
- Search and enable each service from the following list by clicking the Enable button on its detail page:
- Cloud resource manager API (cloudresourcemanager.googleapis.com)
- Service usage API (serviceusage.googleapis.com)
- Identity and access management (IAM) API (iam.googleapis.com)
- Cloud billing API (cloudbilling.googleapis.com)
- Analytics hub API (analyticshub.googleapis.com)
- BigQuery API (bigquery.googleapis.com)
Create a Service Account
- Go to IAM & Admin > Service Accounts in your project. Click Create service accounts.
- Name the service account “Keboola Main Service Account” and provide a description. Click Create and continue.
- Go back to the Service Accounts page and click on the newly created service account.
- In the Keys tab, click Add key and select Create new key.
- Choose JSON as the key type and click Create. The key file will be downloaded to your system. This file is needed for the Keboola BigQuery registration form.
- Assign roles to the service account:
- Assign Project Roles to the service account.
- Go to IAM & Admin > IAM in the project.
- Click Grant access and copy the service account’s email address into the New principal field.
- Select the role Basic > Owner. Click Save.
- Click Add another role and select Cloud Storage > Storage Object Admin.
- Click Save.
- Assign Folder Roles to the service account:
- Paste your folder name or ID into the search bar and select it.
- In the IAM & Admin section, go to IAM.
- Click Grant access and enter the service account’s email address.
- Select the role Basic > Browser.
- Click Add another role.
- Select the role Resource Manager > Project Creator.
- Click Save.
- Assign Billing Roles to the service account:
- Open the Billing section from the navigation menu in your project.
- In the Overview section, find the card with the Billing account with your billing account name and its ID.
- Click on the Manage link.
- Click Add principal.
- Paste the principal email address of the service account created earlier.
- Select the role Billing > Billing Account User and click Save.
- Assign Project Roles to the service account.
Create a Google Storage Bucket
- Navigate to Cloud Storage > Buckets. Click Create Bucket.
- Name the bucket, e.g., “keboola-yourorganization-files”. The bucket name must be globally unique, so choose a custom name.
- Choose the region where your data will be stored.
Important: The bucket must be set in the same region as the product bought through the marketplace. For example, if you buy a Keboola EU product, select the EU region; otherwise, the registration of the BigQuery backend in Keboola will be rejected. - Set other options as desired. We recommend checking Enforce public access prevention on this bucket. Click Create.
- Once the bucket is created, select the Lifecycle tab and click Add rule.
- Select the action Delete object and click Continue.
- Under Select object condition > Set rule scopes, select Object Name Matches Prefix and set the prefix to
exp-2/. - Under Select object condition > Set conditions, select
Age. Set the age to2 daysand click Create. - Repeat the previous steps for the prefix
exp-15/with an age of15 days.
Note: If you want to see your BigQuery tables directly in the BigQuery console, go to your folder and add a BigQuery Data Viewer or higher role.